
How to tighten the screw piles yourself with your own hands. Tightening screw piles with a meat grinder
At the initial stage of the construction of pile-screw foundations, the piles are screwed into the ground until the bearing layers are reached, located below the freezing line. Installation possible screw piles do it yourself, in which a specialized tool is not required, as well as a mechanized installation by means of various kinds of equipment for. Let's consider the common methods of the initial construction of a SVF in more detail.
Manual assembly
Screwing in screw piles by hand is a simple and quite effective installation method. You can save on special equipment and achieve results comparable in quality. The manual technique allows you to control the angle of inclination of the rod and the amount of torque indicating the density of the soil layer into which the screw piles are wedged.
 A traditional device for twisting a screw pile with your own hands is a mounting head, placed on the upper end. To fix the head, pins are used that go through the technological hole. Two clamps are welded to the head, into which the workers directly engaged in screwing insert the levers (trims of a thick-walled pipe are suitable). Basically, this is all the required tool. You can also use a vertical level to measure the tilt angle more accurately.
Manual installation sequence:
- Pre-drilling of a well to a depth of 50 centimeters. Its diameter should be 10 centimeters less than that of the blades welded onto screw piles;
- Vertical positioning, installation of levers;
- Twisting the rod directly. Two workers transmit torque by means of levers, the third monitors the angle of inclination.
The manual method has its limitations: the rods can be twisted up to a depth of 3 meters. In addition, the work required enough space for workers to use long levers.
Ways to mechanize the twisting process
If the screw piles have a large length and diameter, mechanized tools will be required to tighten the screw piles. Since with their help the work is done much faster, the manual method of screwing is gradually being abandoned. Now a specialized device is available for sale, designed exclusively for working with SHS. However, due to the rather high cost of this equipment, first we will consider homemade devices that perform the same tasks.
 For the manufacture of a device for screwing screw piles, the following assemblies are required:
- Powerful drill (can be replaced with a motor-drill);
- Reducing ratio gearbox;
- Two adapters connecting in series the power plant, the pile and the output of the gearbox;
- Lever for support.
Any electric tool with a powerful motor (minimum 2 kW) can be used as a power plant. And also the drive must have a reverse function. The role of the gearbox can be performed by a nutrunner with a built-in torque amplification mechanism. Similar devices are used when sorting wheels on trucks. The main parameter that you should pay attention to when choosing a gearbox is the limiting torque. As practice has shown, a 4.7 kNm reducer is enough to tighten a rod of any diameter.
The adapter between the gearbox and the power plant can be created from a head and bolt of the appropriate size. The bolt is installed in the drill chuck, and the head is fixed to the gearbox. As a pile adapter, a mounting head is suitable, put on the pile and equipped with a tip that is compatible in shape and size with the gearbox shaft.
During the screwing process, the tip may bump into a stone or other obstruction. When manually twisting, the obstacle that appears will immediately make itself felt and it will be possible to take actions to eliminate it. If screw piles are screwed in with an electric drill, the increased noise of the drive will become a clear sign of an obstacle. In this case, it is necessary to immediately turn off the power plant so that overloads do not occur.
Use of special equipment
The first specialized screw pile tightening machine was produced on a truck crane platform equipped with an overhead rotator. Such installations had high power and made it possible to carry out installation work quickly enough. However, they were not equipped with a vertical position control mechanism; the angle of entry had to be monitored manually.
 In modern technology, for the automatic twisting of screw piles, mechanisms are used that fix the slightest deviation from the vertical direction. To hold the pile in the correct position, clamping and lifting jacks are used.
Automatic swayvers are equipped with an all-wheel drive chassis or are installed in the body of a truck. To power the electric motor of the installation, a generator can be used or it is connected to a 380 V network. The characteristics of the swavers differ significantly depending on the manufacturer. If a machine for twisting screw piles is rented, you need to pay attention to the following parameters:
- Electric drive power. This characteristic determines which screw piles can be serviced by the installation;
- Manufacturer's recommendations for maximum bar length and diameter.
- Before drilling begins, the soil characteristics should be studied, in particular the depth of the dense strata. With this information, you can plan further work, choose a tool;
- Places of installation of rods must be marked in advance. The building load must be evenly distributed;
- Immediately before screwing, a well is drilled at the installation site, which serves as a guide;
- The height of the installed pile should be kept with a small margin. Extra centimeters can be trimmed off later when leveling.
Conclusion
Should you use special equipment for screwing in screw piles or use a manual method? It all depends on the budget allocated for the construction. And also the choice of technology is influenced by: foundation arrangement, soil characteristics, pile dimensions. Regardless of the chosen installation method, general principles remain similar and everyone can master this technology.
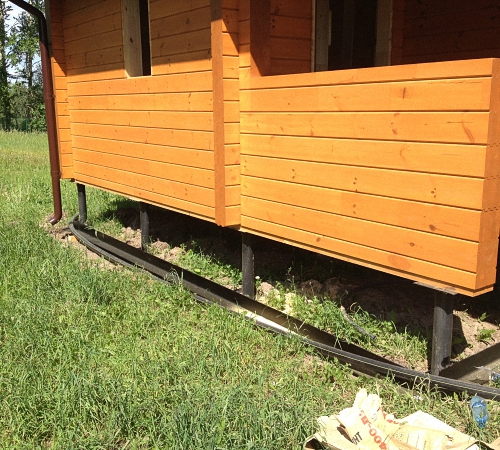
The installation of screw piles allows you to build a massive and solid foundation in a fairly quick time. It is better not to make piles for the foundation for a house yourself, but to purchase them from specialized firms. Since the highest load is imposed on these elements and the service life of the house directly depends on their quality. It is quite possible to make piles for a small outbuilding or for a fence on your own. We will learn how to do this further.
DIY screw piles: features and benefits
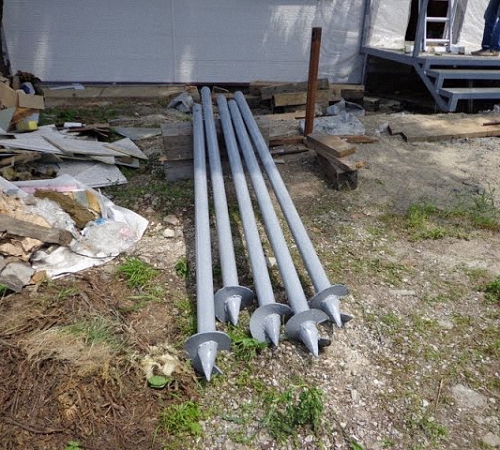
Screw piles are a steel pipe with a blade welded to the end. That is, this element is somewhat similar to a drill. The main functional element of the pile is a screw-type tip, the blade of which, on one side, performs a supporting function, and on the other hand transfers the load. In addition, the screw part acts as an anchor that holds the pile in the ground.

In the process of building light wooden structures, quite often the problem of heaving of the soil arises, as a result of which the foundation collapses. To prevent this unpleasant phenomenon, the piles are installed below the depth of soil freezing. Thus, it is possible to prevent the influence of the heaving force on the foundation.
Screw piles allow you to build a fast, high-quality, economical foundation option. There are several sizes of piles, which are selected based on the size and material of construction of the structures.
Among the advantages of using screw piles in private housing construction, we highlight:
- the pile foundation is erected both in winter and in summer or in autumn or spring;
- the speed of the construction of the building, the foundation is installed in a few days, work on the construction of the structure continues immediately after the foundation is made;
- no need to level the site for building a house;
- the pile foundation is suitable for any kind of soil with a complex relief structure.
However, the foundation on screw piles also has certain disadvantages. First of all, the piles corrode, as a result of which they are destroyed. The service life of such a foundation is lower than that of a concrete one. In addition, poor-quality processing of the material, incorrect manufacturing technology of piles also negatively affects the duration of their operation. It is recommended to use piles when building a house only if the material is certified and has a number of documents confirming its quality.

The following factors reduce the operating time of screw piles:
- the presence of power plants near the house;
- using piles as grounding;
- prolonged swelling of the soil and the presence of groundwater next to the pile;
- the presence of a railway track near the house.
Thus, if you want to choose a pile type of foundation for building a house, consider all the advantages and disadvantages of piles in operation.

DIY screw piles video and varieties
In relation to the composition of screw piles, they are welded and cast. The first option - more economical, have the shape of a pipe on which a pointed tip is welded. These piles are not capable of withstanding a heavy load and are used for the construction of gazebos, outbuildings... Welded seams on piles are susceptible to rapid corrosion, and poor-quality performance leads to complete destruction of the pile. If the blade is welded inaccurately, the pile is set unevenly into the ground during the screwing process. In addition, problems arise when driving piles into stone soil or large roots.
This further leads to uneven subsidence of the house and its emergency position. Therefore, when choosing piles for the foundation, special attention should be paid to the quality of welded joints on the piles.
A pile with a molded tip is more reliable, but also more expensive. For the manufacture of such piles, a casting method and a vacuum sphere are used. These tips are characterized by high precision of installation. The cost of such piles is a quarter higher than that of welded piles. Cast tips are also amenable to high-quality anti-corrosion treatment and are recommended for use in the construction of massive buildings.
DIY screw piles for the foundation video:
The service life of a foundation with a cast tip is about one hundred years. However, when buying such piles, you should also take special care so as not to fall for a fake. The quality of the tip is determined by the accuracy of the factory technology For example, after the construction of the pile, it, in mandatory amenable to heat treatment.

DIY screw piles for the foundation - manufacturing technology
The screw pile has the form of a hollow pipe, one part of which has a cutting part in the form of a sharp tip. In the process of setting the pile into the ground, the cutting part allows the pile to move deeper. Thus, it is possible to reliably fix the pile in the ground.
The structural structure of the piles allows you to install them yourself, without the involvement of additional special equipment. However, the term of use of the foundation directly depends on the quality of the material from which the piles are built.
Before starting the manufacture of screw piles, determine their structure, which includes three main parts:
- bearing element - has the shape of a pipe, with a minimum diameter of 9 cm;
- screw part - provides screwing of the pile;
- the upper part, on which the timber is fixed.

For the manufacture of piles, a pipe with a certain diameter is used. In the presence of a non-cast tip, for the manufacture of a pipe, it is necessary to use several sectors connected by a welding machine. To eliminate the seams, the material is straightened.
The machined discs are used to manufacture the screw part. The size of the screw part depends on the depth of the pile. Further, using a vice, the workpiece is clamped in a certain position and stretched to the desired size. After fixing it on the surface of the pile, the element is coated with an anti-corrosion solution or paint.
A head-shaped part is installed on the top of the pile. It is on it that the channel or beam will be fixed. The width of the pile blades is at least 3 cm larger than the pipe diameter.
Screw piles DIY installation video:
Features of installing screw piles with your own hands
In the process of working on the installation of screw piles, you will need:
- reinforcement used for marking;
- grinders;
- levers;
- welding machine;
- normal level;
- concrete solution.
Initially, you should perform a number of preparatory work for the installation of the foundation part. At this stage, drawings are drawn up, calculations are performed, the length and dimensions of the piles are determined. To do this, it is necessary to study the geological features of the soil, in relation to them, the depth of piling, the number of piles for a particular building, etc. is determined.
For ease of use of the plan, it should be divided into several parts, which facilitate the control of the installation site of each pile. It is necessary to make a pile field from the installation of piles, which are installed at the corners of the rectangle. Reinforcement is installed on the corner parts of the site. Consider the width at which the strapping is performed. In this case, the installation of piles is necessarily carried out along the central part.
A tightly stretched rope is used to connect the reinforcement or the peg. Where the rope intersects, the pile installation points are determined. The installation of the reinforcement is carried out in relation to the drilling points. Measure the diagonal sections that result from the intersection. piles should be installed at the same distance from each other.
It is possible to use a budr for work, but its diameter should be several centimeters larger than the diameter of the pipe. Installation work should be started from the corner sections. The spacing between the piles must be the same. A magnetic level is mounted on the pile, which prevents it from leaving in a vertical position. The quality of the manufactured foundation directly depends on the density of the pile field.
Installation work - how to tighten screw piles with your own hands
For screwing in piles, pipes are used that act as levers. A scrap is installed inside the pipe, with its help the pipe is screwed in. Please note that this process requires special physical effort, so at least two people are required to complete it.
There are two ways to install screw piles with your own hands. The first involves the use of a drill, and the second is based on the installation of a pile without a drilling rig. In the process of self-screwing a pile without a drill, the soil underneath is compacted and the pile is securely fixed in a certain position.
Thus, moisture does not penetrate through the compacted soil and it holds the pile well. To align the piles, they also use improvised means in the form of spacers or scrap. A screw jack is used to eliminate small deviations.
Next, a common frame is mounted. For these purposes, you will need a laser level. In relation to this measuring device, the piles are trimmed and a concrete solution is prepared for pouring into the pipes. Next, the headrests are installed, the seams are cleaned. An element is mounted on the headrests to perform a common ligament, which increases the rigidity and durability of structural elements.
It is quite difficult to build a house with screw piles with your own hands. However, we suggest that you familiarize yourself with general recommendations that will greatly simplify this process:
- for the manufacture of steel lugs, use grade 25 metal, while using cold welding;
- with an increase in the diameter of the screws, the complexity of the manufacture of blades increases, since in order to unbend the steel disks, it is necessary to apply certain physical efforts;
- if the pile is unevenly installed in the soil and has gone to the side, then to correct the situation, it is enough to cut off its upper part and install another pile next to it, you do not need to pull out the pile, since the previously loosened soil will not hold it securely;
- make sure that the solution completely fills the pipes, this process must be performed with special care;
- if there are two blades on the surface of the pile, they should be installed below the amount of soil freezing, otherwise, the pile will be subject to heaving forces;
- all welding components must be coated with an anti-corrosion compound.
The process of installing piles is simple, however, well-installed piles are obtained only if the technology of installation work is carefully followed.

Among the main structural elements of the pile, we note the stem part, the cutting element and the tapered tip. If the building is made of wood, then the head is another part of the pile.
Self-production of piles is a rather complicated process, the quality of which directly depends on the service life of the building under which the piles are laid. The resulting piles are determined by the quality of the steel and the welds used to connect the elements together.
A well-made pile can be easily screwed into the soil, has a high resistance to mechanical stress and easily copes with the functions assigned to it.
For self-construction of screw-type piles, you will need:
- pipes made of high-quality steel with a diameter that is calculated in advance and depends on the pressure on the foundation;
- steel sheets for the manufacture of blades, screw section, etc.

The main technical indicators of the screw pile are the length of the pipe and the size of the blade. In order to build the trunk of the pile, it is necessary to cut triangles at the end of the previously prepared pipe with a grinder, and with the help of a sledgehammer, you need to form cones on them. For the manufacture of the screw part, special blanks with a cast tip are used. With the help of a mount, the workpiece is stretched in the form of a spiral, then connected to the pipe with a welding machine. Monitor the quality of welded joints, after the construction of the piles, they are treated with a special solution.
Homemade piles are used for the construction of small outbuildings, garages, gazebos and other structures. For the construction of a house on a screw-pile foundation, it is recommended to use purchased pile options.
Do-it-yourself installation of screw piles video:
At the initial stage of the construction of pile-screw foundations, the piles are screwed into the ground until the bearing layers located below the freezing line are reached. Do-it-yourself installation of screw piles is possible, in which a specialized tool is not required, as well as mechanized installation using various kinds of equipment for screwing screw piles. Let's consider the common methods of initial construction of a SVF in more detail.
Screwing in screw piles by hand is a simple and quite effective installation method. You can save on special equipment and achieve results comparable in quality. The manual technique allows you to control the angle of inclination of the rod and the amount of torque indicating the density of the soil layer into which the screw piles are wedged.
 A traditional device for twisting a screw pile with your own hands is a mounting head, placed on the upper end. To fix the head, pins are used that go through the technological hole. Two clamps are welded to the head, into which the workers directly engaged in screwing insert the levers (trims of a thick-walled pipe are suitable). Basically, this is all the required tool. You can also use a vertical level to measure the tilt angle more accurately.
Manual installation sequence:
- Pre-drilling of a well to a depth of 50 centimeters. Its diameter should be 10 centimeters less than that of the blades welded onto screw piles;
- Vertical positioning, installation of levers;
- Twisting the rod directly. Two workers transmit torque by means of levers, the third monitors the angle of inclination.
The manual method has its limitations: the rods can be twisted up to a depth of 3 meters. In addition, the work required enough space for workers to use long levers.
Ways to mechanize the twisting process
If the screw piles have a large length and diameter, mechanized tools will be required to tighten the screw piles. Since with their help the work is done much faster, the manual method of screwing is gradually being abandoned. Now a specialized device is available for sale, designed exclusively for working with SHS. However, due to the rather high cost of this equipment, first we will consider homemade devices that perform the same tasks.
 For the manufacture of a device for screwing screw piles, the following assemblies are required:
- Powerful drill (can be replaced with a motor-drill);
- Reducing ratio gearbox;
- Two adapters connecting in series the power plant, the pile and the output of the gearbox;
- Lever for support.
Any electric tool with a powerful motor (minimum 2 kW) can be used as a power plant. And also the drive must have a reverse function. The role of the gearbox can be performed by a nutrunner with a built-in torque amplification mechanism. Similar devices are used when sorting wheels on trucks. The main parameter that you should pay attention to when choosing a gearbox is the limiting torque. As practice has shown, a 4.7 kNm reducer is enough to tighten a rod of any diameter.
The adapter between the gearbox and the power plant can be created from a head and bolt of the appropriate size. The bolt is installed in the drill chuck, and the head is fixed to the gearbox. As a pile adapter, a mounting head is suitable, put on the pile and equipped with a tip that is compatible in shape and size with the gearbox shaft.
During the screwing process, the tip may bump into a stone or other obstruction. When manually twisting, the obstacle that appears will immediately make itself felt and it will be possible to take actions to eliminate it. If screw piles are screwed in with an electric drill, the increased noise of the drive will become a clear sign of an obstacle. In this case, it is necessary to immediately turn off the power plant so that overloads do not occur.
Use of special equipment
The first specialized screw pile tightening machine was produced on a truck crane platform equipped with an overhead rotator. Such installations had high power and made it possible to carry out installation work quickly enough. However, they were not equipped with a vertical position control mechanism; the angle of entry had to be monitored manually.
 In modern technology, for the automatic twisting of screw piles, mechanisms are used that fix the slightest deviation from the vertical direction. To hold the pile in the correct position, clamping and lifting jacks are used.
Automatic swayvers are equipped with an all-wheel drive chassis or are installed in the body of a truck. To power the electric motor of the installation, a generator can be used or it is connected to a 380 V network. The characteristics of the swavers differ significantly depending on the manufacturer. If a machine for twisting screw piles is rented, you need to pay attention to the following parameters:
- Electric drive power. This characteristic determines which screw piles can be serviced by the installation;
- Manufacturer's recommendations for maximum bar length and diameter.
- Before drilling begins, the soil characteristics should be studied, in particular the depth of the dense strata. With this information, you can plan further work, choose a tool;
- Places of installation of rods must be marked in advance. The building load must be evenly distributed;
- Immediately before screwing, a well is drilled at the installation site, which serves as a guide;
- The height of the installed pile should be kept with a small margin. Extra centimeters can be trimmed off later when leveling.
Conclusion
Should you use special equipment for screwing in screw piles or use a manual method? It all depends on the budget allocated for the construction. And also the choice of technology is influenced by: foundation arrangement, soil characteristics, pile dimensions. Regardless of the chosen installation method, the general principles remain similar and everyone can master this technology.
Do-it-yourself installation of screw piles for the foundation: methods, technologies, recommendations and practical experience of FORUMHOUSE users.
The installation of a screw foundation is a decision that is made by the developer based on accurate calculations and logical justifications. There is still a lot of work ahead of him, and the most important thing that should be taken care of first of all is to avoid mistakes when arranging the foundation for future construction. The cost of installing piles and the desire to complete the basic processes of building a house yourself make you set serious goals.
Correctly mounting a screw foundation means observing all the specified parameters: horizontal and vertical levels, distances between piles, permissible deviations from linear dimensions, etc. distances, we will talk in this article.
Do-it-yourself installation of a pile screw foundation is a laborious task. It requires error-free calculations, the presence of special devices and the participation of at least two people - the cost of an error here may be too high.

Screw piles: installation in two ways
The installation of piles without the involvement of specialized construction equipment is carried out in two ways: manual (long metal levers are used for screwing) and mechanized (involves the use of mechanical devices driven by a compact engine).
Screw piles: manual installation
The simplest screwing device is a mounting head that is put on the product barrel and fixed there with a pin inserted into the technological holes.

Screw foundation: installation.
Clamps are welded to the head, into which levers are inserted to transmit torque to the pile. In principle, the pile can be screwed in by inserting the crowbar with levers directly into the technological holes of the support.

But for the uneven distribution of the load in this case, you can pay a high price: this will lead to the fact that the tip will be deformed even before the screw reaches hard layers of soil.

As levers for screwing, you can use 2 pieces of thick-walled metal pipe (the wall thickness must be at least 5 mm). The levers are 2-3 meters long.
A semi-axle from a Mercedes truck was inserted into the technological holes, two two-meter pipes were put on it and "ONCE" puffed up. The levels were checked after each revolution. One turn - 10 cm down.
Installation of piles:sequence
If you do not want to make mistakes during self-tightening, then the correct positioning of the supports guarantees you 90% success.
The installation of the pile-screw foundation differs in that it is more correct to mark the location of future supports not before the start of work, but in the process of their implementation. This will allow them to be arranged in strict accordance with the dimensions of the future house, bathhouse or any other building.
The fact is that the preliminary marking of the foundation does not always allow placing the piles in exact accordance with each other. Therefore, the marking must be done, starting with determining the location of any corner point of the future building.
For clarity, we present the diagram pile foundation dimensions 6 * 6 meters.

The order of installation of piles in the diagram is numbered. The first to be screwed in is # 1, located in the upper right corner of the diagram.
Under No. 1, in established place, using a shovel or a drill, we dig a pit, the diameter of which is approximately equal to the diameter of the pile blade. The depth of the pit should be 20-30 cm. Some do more, but there is no particular need for this. Conversely, too much pit depth makes it difficult to maintain the correct distance between the piles.
First, they made indentations with a garden drill (50-80 cm), then piles were installed. I made money, my friend controlled the level. Then they screwed in together.
The first is the easiest to screw in. During work, it is enough to control the vertical level of the pile (it is best to use a magnetic level for this). If there are three of you, then one person uses a level to control the position of the pile in space, and the other two screw the support into the ground.

Twisting together is very difficult. Therefore, it is better to involve 4 people in the hardest work. The pile is screwed into the ground to a depth exceeding the freezing depth. Its tip should enter hard soil for several turns.
The pile should be screwed into the ground until it comes to a complete stop. Only such an approach can guarantee that it will not be pushed out of the ground by the forces of frost heaving.
The pile is twisted by 4 people using levers of 2.5 meters. They twist all the way until their feet burrow into the ground. Understanding this moment comes with experience. The blade should be twisted below the freezing level. It makes sense to follow the vertical level at the initial stage. Once the pile has entered about 80 cm, it will be very difficult to align it.
After the installation of the first pile is completed, you can start marking support No. 2. The landmarks in this case will be the dimensions of the wall and the distance between the axes of the piles. Suppose that the distance between the axes is 5850 cm (it can be calculated by knowing the length of the wall and the dimensions of the heads on the piles). The plane of the wall runs parallel to some other object (parallel to the fence, etc.). In this plane, draw a straight line and mark the indicated distance. This will be the location of the axis of the second pile.
Here we also dig a shallow pit, insert the pile, check its vertical level and measure the distance between the axes of the two supports. If there are no deviations, then we start screwing. Otherwise, the pile will have to be leveled. If No. 2 needs to be moved a few centimeters to No. 1, then its top should be deflected in the opposite direction from No. 1. After that No. 2 must be screwed into the ground for 2-3 turns. Then, having placed the support vertically, the center distance should be checked again. If all dimensions are the same, No. 2 can be screwed in until it stops. If not, then we repeat the above operations until a satisfactory result is obtained.
The pile always tilts in the opposite direction from the one into which the screw-in support must be pushed.

They screwed it in 2-3 turns (one turns, the other holds it vertically), then looked at the tape measure, figured out where to move. Then, twisting at an angle, they brought the bottom to a point. We put it vertically (while spinning) and looked at the roulette again.
The location of pile No. 3 is determined based on two linear dimensions: the diagonal of the box of the future house (8273.15 cm) and the distance between the corner piles (5850 cm). The marking is done using two tape measures (No. 3 will be installed at the intersection of the set values on their measuring strips).

No. 3 and No. 4 are set by analogy with No. 2. After the corner supports are screwed into the ground, a construction rope should be pulled along their outer perimeter. The rope will make it easier to mark and install the remaining piles that need to be screwed into next order: first, the supports located along the outer perimeter of the walls are mounted, and then the inner ones.

After all the piles have been screwed in, they should be cut. Pruning is done with a grinder on a marked horizontal level.
Laser cropping is a sweet thing. It turned out to be convenient to hang the clamp for marking on top of the cut, then carefully outline it with a grinder, then move the clamp higher and cut off the pile.
Incomplete screwing in for the purpose of aligning all supports on a horizontal level (without subsequent cutting) is an unacceptable violation of construction technology.
The cut piles are filled with cement-sand mortar. After that, you can weld the heads to them and proceed with the installation of the strapping.

The pile should be filled with cement mortar, not concrete. Crushed stone is badly rammed, therefore, after pouring concrete, cavities with air can form inside.
The cement mortar does not make the screw pile structure stronger. The main purpose of filling the support with a solution is to block the access of oxygen to its internal cavity.
Screw pile driver
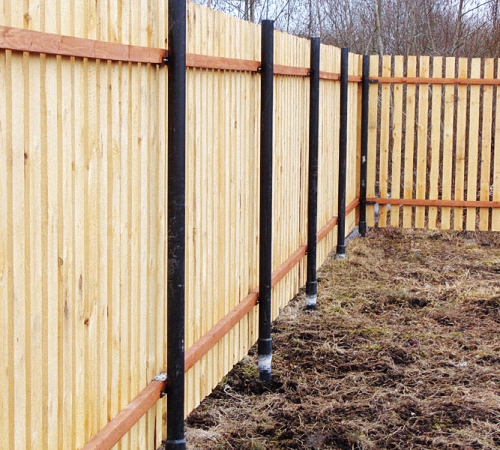
As we have already said, the manual screwing method requires a lot of physical effort, which not everyone can withstand. If you are not a miracle hero, ready to pay a high price for your health for the foundation, think about mechanization. Mechanization is also necessary if the screwed-in pile is located near any ground object (near a fence, etc.). In this case, screwing it in with the long levers is much more difficult.
Today you can buy a ready-made device (albeit at a rather high price) designed to mechanize this process (svayakrut).

But such an installation for screwing piles is expensive, and it is advisable to purchase it only when providing services for the construction of pile foundations. The cost of installing screw piles will eventually pay off the purchase of this device. And to work on your own site, you can build a homemade device driven by a powerful drill or a gas drill (motor-drill).
If you are not ready to make the device yourself and want to order the installation of screw piles, the price and quality should be commensurate. We advise you to look for a performer on our exchange, and not only for residents of Moscow, but also for many other regions.
Do-it-yourself equipment consists of several units:
- Power unit (drill, motor-drill, etc.);
- Reducing mechanical gearbox;
- Adapters: from the power unit to the gearbox and from the gearbox to the pile:
- Support arm.
Here the screw pile driver looks like an assembly.

Let's consider all the components in more detail.
Power unit
As a power unit, you can use an electric motor, a gas drill or a powerful electric drill. Using an electric drill is the most affordable option of all of the above, but it must meet certain characteristics:
Speed control must be provided;
The minimum drive power is 2000 W;
The presence of a reverse.
Device - Rebir (electric drill brand) with a power of 2 kW. The frequency of revolutions when working through a reduction gear is 300 rpm.
The motorized augers or electric motors used for twisting must also have the specified power.
Reducer
The most common type of reducer used for screwing piles is an ordinary wrench - a wheel wrench with a torque amplifier (with UKM). It is designed for tightening wheels on heavy trucks. In everyday life, this device is called a "meat grinder".

There is a lot of controversy about the reliability of these devices. But, based on the experience of FORUMHOUSE users, we can say that a properly selected wrench, with regular lubrication and in the absence of overloads, will help you screw not a dozen piles.
Selecting a gearbox should be based on several parameters. The key role is played by the torque that the device is able to create on the output shaft. Manual pile screwing machines are manufactured in such a way that the operating torque is at least 4700 Nm. Consequently, the performance of the impact wrench must match this parameter.
The torque must be more than 4500 Nm. There are reinforced meat grinders that last longer and cost a little more.
The larger the gear ratio, the easier it will be to work with such a gearbox. When choosing a device, you should focus on the gear ratio - 1:60 or more.
Characteristics of the used wrench: gear ratio - 1:64, maximum torque - 5500 Nm, gear hardness - 58-62 HRC.
When buying a key with UKM, you should choose a device with bearings (bearings are not provided in the design of some gearboxes). Bearing wrenches are found to be more durable.
In order for the stop of the nutrunner not to come into contact with the pile during operation, its end can be cut off, leaving the factory holes. We will need the holes in order to subsequently screw the telescopic stop to the gearbox.

The process of operating the gearbox deserves special attention. The presence of lubricant in its internal cavity should be taken care of in advance. If the device is regularly lubricated and made sure that it does not overheat (to avoid overheating, it is necessary to take breaks in work), then the wrench will help several dozen products to be twisted without breakage.
Do not forget to lubricate the gearbox. The gears do not break in it, but seem to be erased, decreasing in thickness and height. Therefore, the more lubricant, the longer it lasts. In the store, they are dry and can be erased in one pile.
The user singer777, for example, changes the lubricant in the gearbox every 20 screwings. So draw your own conclusions. As for the lubricant itself, users of our portal who have practical experience with nutrunners recommend using plastic types of lubricants (SHRUS-4, etc.).
Adapters
The homemade device has two adapters (adapters).
The first adapter transfers torque from the drill to the gearbox. It can be made quite simply: put a head on the gearbox (16 mm, etc.), and insert the corresponding bolt into the drill chuck.

The second adapter is a mounting head for a pile with a tip for the output square shaft of the gearbox.

When going to use the described device, a person must think about how to protect the drill and gearbox from mechanical overloads. There are two ways to solve this problem.
You can recognize the impending overload by the sound of a working drill. Timely disconnection of the device will help to avoid damage.
Installing a metal pin between the drill and the gearbox will not only help prevent damage, but also protect you from injury. A properly sized pin will be sheared as soon as the torque reaches critical values.


The Morse taper is inserted into the Rebir drill, which is connected to the next part using a wire with a diameter of 3mm. This wire works for cutting and serves as protection against overload and burnout of the drill.
As soon as the load reaches critical values, the gearbox with the drill should be disconnected from the pile. After that, it is necessary to tighten the support manually.
We twist until the bolt breaks. If you then put on levers of 3 m on both sides and harness the four of us, then it turns out to turn the pile by 1/4 of a turn or a little more. Today the bolt did not break off (they spared the gearbox and tightened it by hand).
When screwing in the pile using a reduction gear (as in the case of manual screwing), it is necessary to constantly monitor the vertical level of the support.
Support arm
It is advisable to make the support arm from two pipes of different diameters (a telescopic structure with an adjustable arm length is obtained).

In order to prevent the pipe from crushing at the point of articulation with the fastening bolt, it can be reinforced with a small section of a channel, strip or angle.

The pile drivers presented below are not widely used, but they have certain advantages. And if you screw the screw piles with their help, the installation cost will ultimately be lower and you will save a ruble - another one for equally important sections of the construction estimate.
Installation with a hydraulic drive - its reliability is slightly higher than that of a mechanical gearbox.

Installation on a frame - allows you to align the pile as accurately as possible and reduce the labor intensity of the process.

The installation is driven by a gas drill - easy to use and reliable.

What to do if the pile ran into an obstacle
The installation of a pile foundation is fraught with the fact that during screwing the pile often rests against a stone or other foreign object in the ground. And if the barrier is strong enough, then this turns into a real problem. There are two ways to solve it.
If the pile did not have time to go deep, then you can unscrew it and try to remove the obstacle. It is not easy to do this, therefore, it is far from always possible to achieve a positive result.
If the pile rested against an obstacle, but managed to deepen by more than 1.5 m, then it can be left in this position, subsequently cutting off the top along a horizontal level. But in this case, it is preferable to unscrew the pile and screw it in side by side (in line with the adjacent supports). This method is suitable for all piles (except for those located at the corners of the future building).
Corner piles should be screwed in to a sufficient depth and their location should be consistent with the design foundation markings.
s: remove the stone (if the depth is small) or crush it, or twist the pile to the side.

You can learn more about the technical solutions that allow you to screw piles without using expensive construction equipment in the corresponding section of our portal. You can learn how to make a wooden tie for piles during the construction of a frame house by reading the practical experience of FORUMHOUSE users. If you have suitable materials, if you want to independently make screw piles for the foundation for your own house, then you will find a description of the technological process in the corresponding article. And how to combine three different foundations when building one house, you will learn from our video.

Examples of pile twisting, which you will learn about later in the article
The type of foundation and the choice of its design must be justified from an economic and technical point of view. IN Lately the most advantageous is the pile. By design, piles are divided into smooth (as an example - reinforced concrete pillars) and screw (resembling a large screw). Smooth ones are hammered or pressed in, the second technology is used to twist screw piles into the ground.
Pile foundations, their advantages and disadvantages
One of the disadvantages of pile foundations is the need to use special equipment with the help of which screw piles are twisted or pillars are driven.
The advantage is the erection of the foundation on soils that are weak in structure, which makes it possible to use this technology without studying the structure of the soil, deep embedding of the pile base gives a sufficient transfer of force into the soil from the load of the structure.
Another indisputable plus is the absence of the need for site planning. The size of the grillage (the ground part of the foundation) can vary in height up to one and a half meters, and if you use extension cords, by any amount necessary for alignment for the assembly of the frame. (see fig. 1)

Fig. 1. Pile foundation
The main advantages and disadvantages of screw pile foundations
- Disadvantages:
- equipment for screwing piles is required;
- insufficient setting accuracy (the possibility of tilting or shifting a few centimeters);
- limitation of use in the presence of rocks;
- Advantages:
- the ability to use on soft soils;
- the possibility of installing piles without time-consuming earthworks (the complete absence of earthworks allows you to keep the earth layers in their natural state);
- low financial expenses compared with concrete, less labor intensity, significant gain in time;
- high accuracy of height adjustment;
- the possibility of using anchoring (see Fig. 3);
- application in swampy and water areas (see fig. 2)
Constructive varieties
Having appreciated the advantages of erecting such foundations, the industry has established the production of screw piles of two types: with a sharp tip and a crown.
The first type is used for soft and ordinary soils, the second for heavy loams and permafrost. (see fig. 4).
As you can see from the figure, the main difference is the width of the blades, which hold the rod in the ground. For heavy soils and permafrost, this value is less relevant, therefore the blade width is smaller, but the tip is made with a crown to facilitate embedding into the soil. For soft soils, the wider the blade width, the more significant the transfer of the load into the soil, the higher the reliability of the foundation structure.
Pile assortment
If we talk about the construction of the foundation on soils with low bearing density, then these include:
- one blade with a screw diameter up to 500 mm, blade metal thickness up to 6 mm, pipe wall up to 4.5 mm.
- with several blades up to 300 mm in diameter, 5 mm metal thickness, pipe wall 3.5 mm and more.
This assortment is used in the construction of not heavy living quarters and industrial facilities (warehouses, technical booths, checkpoints).
When using products for heavier buildings, it is necessary to use piles with a thicker metal or to increase their installation number.
Piles for loads greater than average are as follows:
- having one blade with a diameter of more than half a meter, a metal thickness of 6 millimeters or more. The pipe wall is 4.5 mm thick or more.
- two or more blades with a diameter of 300 mm, a metal thickness of 5 mm or more, a pipe wall thickness of 4 mm or more.
As for structures that are used in heavy and freezing soils, the thickness of the metal of the rods and blades is of great importance for them, which serves as an additional criterion for qualification. This is due to the sharp and large seasonal changes in ambient temperatures. The main dimensions of industrial piles can be found in tables 1 and 2.

Tab. 1. The main dimensions of industrial piles

Tab. 2. Diameters of shells
Making piles yourself
The amazing ability of craftsmen to overcome circumstances, inventing and making missing technological links with their own hands, manifested itself in the case of screw piles. The industry does not produce piles less than 40 cm - we will do it ourselves, we need an installation for twisting screw piles, we will do this, or we will twist the piles with one hand, as people in the video do.

Fig. 4. Construction of piles
Before starting the manufacture of a screw pile, you need to remember its design:
- central trunk (hollow thick-walled pipe);
- a tip representing a pointed cone or serrated edge (crown) at the end of the drill;
- screw blades attached to the tip;
- the upper part of the pipe can be equipped with a head or anchoring for the subsequent installation of the elements of the foundation frame;
- at the end of the pipe, two holes with a diameter of 24 - 26 mm are drilled at a right angle at a distance of 10-15 cm from each other (see Fig. 4).
Start of work on self-production
Before starting, it is necessary to determine what the load on the piles will be to determine their number. The load is roughly calculated as follows: knowing the weight of a structural element (a log house means logs, cinder block or brick), we multiply by the number of elements, and divide by the permissible load. The load on one rod should not exceed 500 kg. Based on this, you can determine the number of piles, then determine the size of the blades and draw a sketch to scale.
"Advice: If a stove or fireplace is planned in the house, we make an additional calculation for this structure separately"
But back to the drawing, because it will be easier to determine the quantity by a visual image required material and rationalize it.
First of all, the drawing should indicate:
- diameter and length of the pipe (better with respect to scale);
- rod length including tip and anchoring;
- the length and angle of the cone (or simple bevel);
- distance from tip to blade.
Having finished the drawing, you can start making the helical blade.
Required tools and materials:
- plasma cutter;
- workbench with a vice;
- a metal lever or crowbar to unbend the cut out propeller blade;
- calipers for making a template.
The template is best made from tin. For this we cut out the diameter of a large circle equal to the diameter of the propeller blade and a small circle equal to the diameter for the rod, as well as the cut line. Having cut out the template, you can proceed to the layout of the sheet.
Cut sheet metal
To correctly cut a sheet of metal, it is necessary to measure the correct filling of the sheet with a template several times. In case of a shortage of blanks or irrational consumption of iron, it is allowed to remake the template in the direction of increasing or decreasing the diameter of the outer side of the blade.
It should not be forgotten that the number of blanks must correspond to the number of rods. For the rational operation of the plasmatron, mark the cuts of adjacent circles along one line as a whole.
It will also be rational to place the markings of two adjacent rows with an offset of the diameter by a distance equal to the radius from each other. In this case, the top of the circle of the lower row will be between the circles of the upper row, such a marking will correspond to the minimum waste of metal. (see fig. 5)

Blade notch
Once again we check the correspondence of the marked number of future blades to the number of rods and proceed to cutting the workpiece according to the marking. First of all, the hole for the rod is cut, then the circle is cut along the radius. The end will be a cut along the outer contour. Below you can watch a video of how the blades are cut using plasma cutting:
Spreading of the cut edges of the blade
In order to spread the edges of the cut rings, the ring is clamped in a vice and with a metal lever at least one meter long, the edges are bent away from each other. In this case, it is necessary to take into account that the larger the gap, the greater the grip of the soil and the resistance to rotation when screwing in.
The optimal size of the gap is 10 - 20 cm. It is also necessary to ensure that the plane that will be located to the tip is bent less than the opposite one.
We make a cone
For the manufacture of the cone, we use the remaining acute-angled parts of the sheet iron from the cutting of the blades. Having cut out the triangular corners, it is necessary to weld them together, carefully adjusting the pipe diameter. In the process of welding the tips, it is necessary to ensure that the seam is tight, this excludes the ingress of water into the internal cavity.
Carefully check the quality of the welding by removing the scale with a metal hammer blows along the seam in the direction away from you.
End of screw pile manufacturing

Fig. 6. Welding cone and blade
After the cone is welded, a blade is put on the pipe at a distance of 50 mm from the edge of the pipe and carefully welded on both sides. Don't forget to make two holes at the end of the drill rod. (see fig. 6)
Installation of piles
As noted above, the industry does not produce special devices, therefore, devices for twisting screw piles with their own hands were invented and implemented by craftsmen, the most common are:
- Manual twist.
- With the help of a "meat grinder".
- With a winch.
Let's consider each of them in more detail.
Hand twist

Fig. 7. Installing piles manually
The name of the method speaks for itself: the screw piles are twisted by hand. Several long metal rods are taken (preferably from reinforcement) and inserted into the holes made in the pipe or in special clamps that are fixed to the pipe.
The process of twisting occurs by the transmission of the rotational movement of people who walk in a circle, screwing the drill into the ground. How the process works
can be seen in Fig. 7.
This is good when you need to install several piles, and if there are several dozen of them or they are located not far from buildings, then you can use the "meat grinder" device.
Screwing in with a "meat grinder"

Fig 8. Reducer "Meat grinder"
More recently, the industry has released a gearbox to facilitate the loosening of car wheel nuts. The device consists of a planetary gearbox and a screw, which is located exactly in the middle. The reducer has a manual drive similar to the handle from a meat grinder, hence its name.
After the gearbox was supplemented with adapters for the rod drive, a device was obtained with the help of which the screwing of the screw piles with a meat grinder became much more efficient.
The reducer is the only consumable in this design. The approximate cost of the gearbox is 1.5 thousand rubles. You will also have to order or purchase a set of adapters for the drill rod drive. The rotation of the device is made from a drill (preferably a perforator) with a capacity of at least 2 kilowatts with a speed of 700 - 900 rpm. in min.
The fixture is installed on top of the rod. The rod is held in an upright position by a long metal lever attached to the body of the fixture.
Control over the vertical position by level, which is fixed on the rod. (see fig. 8)
With a winch.

Fig 9. Installation of piles using a car winch
In this case, the installation for twisting screw piles is made not from a "meat grinder", but from an automobile winch. The main difficulty lies in securing the winch drum to the auger shaft. In this case, adapters are also used, which are specially made for the rod and drive of the winch. This is only an electric winch. (see fig. 9)
Instead of output
Finally, here's another example of doing the work that has been widely described in this article, enjoy your viewing!
The foundation based on screw piles is considered one of the most affordable in terms of financial costs and technical implementation. The installation method is so simple that it can be done without professional assistance. However, depending on the scale of the project and the conditions for its implementation, auxiliary equipment may also be required. Its choice is determined by the specific technology of mounting the supporting equipment. For example, in the question of how to install a small-format screw pile, complex equipment may not be used at all, since twisting will be performed by two or three people with improvised devices. However, in the case of large rods, special technical means are indispensable.
In what cases is a pile foundation used?

In terms of mechanical bearing capacity, this method of building the base of a house loses more traditional ways the formation of a monolithic and even strip foundations... Therefore, first of all, one-story, prefabricated and other objects that do not imply large loads are erected on a platform with point-like structure retention elements. For example, frame houses on screw piles, which are durable and reliable. Often, technical facilities are also built: baths, hangars, utility rooms, senniki, etc.
The nature of the local soil also influences the choice of technology. The same classic foundations with a monolithic structure are undesirable to use on such surfaces. However, metal rods neutralize the loads associated with the dynamic processes of the soil layer, which makes them an attractive solution for these operating conditions. Modest cost is also an additional attractive factor in the choice of screw piles for the foundation. Prices with installation are on average 1500-2000 thousand rubles. for 1 pc. Moreover, as a rule, ordering material with installation work from the same supplier reduces the cost of rods by 100-200 rubles.
Screw pile design

Typical elements are hollow pipes with a head on one side and a pointed tip with a threaded blade on the other. The part that is designed for immersion in the ground has an anti-corrosion coating, due to which the durability of the structure can reach 40-50 years. As for the functional tip, it can be made in different ways. The main distinguishing feature is the number of turns, on which the force applied to the rod will also depend. Elements with a small area of the cutter require the least power costs, but how to install a screw pile provided with many turns? Special equipment usually works with such models. The machine grabs the ground part of the rod and twists it into the ground. On the one hand, this approach complicates the installation process and makes construction more expensive, but on the other hand, the more turns, the stronger the supporting base will be, that is, at all costs, the user will receive an optimal foundation structure in terms of quality.
Calculation of screw piles
Despite the initial choice of this type of foundation for objects with minimal loads, this does not mean that the number of rods and the configuration of their placement can be any or universal for all cases. These parameters depend on the specific indicators of the planned load. The total weight consists of the mass of walls, flooring, partitions, roofing, equipment, etc.
The calculation of screw piles provides for the inclusion of a safety factor: about 10-15% of the safety endurance of the structure is added to the summed loads from individual elements. Further, the ability to cope with the loads of one bar is taken into account. A typical model can take on about 2000 kg. Initially, the calculated mass of the house is divided by this figure and the result will show what the optimal number of piles will be. For example, for small house weighing 20,000 kg, 10 load-bearing elements are required. Another bar can be added to cover the safety factor. As for the placement configuration, it will depend on the area of the house, as a rule, an indentation scheme of 2 m is taken between the installation points with the obligatory capture of the corners of the structure.

Preparing for work
After purchasing the piles, it is necessary to carry out a thorough examination of their appearance. Particular attention is paid to the reliability of the blade attachment to the main part. If necessary, the structure is additionally welded with the addition of a melt increasing the strength. But how to install a screw pile if foreign protruding elements are present in the functional part? First, even at the stage of reworking the underground area, the area of deviations of the same melt from the main surface of the rod should be minimized by mechanical reworking with a grinding and polishing tool with coarse grains. Secondly, the twisting process itself must be corrected in this case. The operation should be performed at low speed, constantly monitoring the geometry of the pile penetration.
Screwing by hand

Most often, a two-lever system is used, which allows you to completely do without special equipment, but at the same time provide sufficient force to immerse the rod. Another thing is that this twisting mechanism can only be used with small or medium screw piles for the foundation. Do-it-yourself installation in this case is implemented as follows:
- In the area of the head, ears are welded, on which elements of the direction of force will be fixed in the future.
- Metal beams (levers) are laid in the created holes and held on opposite sides by two workers.
- The control operator with an electronic level becomes directly at the twist point.
- The workers who control the levers begin to move with the gripping of the levers until the target immersion point is reached.
- The operator with the level controls the vertical of the twist throughout the entire process.
The double-lever mechanism with a head grip is the simplest device for screwing screw piles, but it has certain drawbacks. First of all, you will need free space around the dive point. In addition, in the event of a deviation from the intended input line, there is a risk of deformation of the bar or an error in the arrangement of the foundation bearing points.
Screwing technique with electromechanical devices

This option is suitable in cases where there are no special equipment or partners. The effort is applied using a multiplier. It is an optimized planetary gearbox. The device is mounted on a high-power drill's working attachment and then mounted on a support platform fixed near the screw pile. The installation technology is carried out by rotating the gearhead. Fast working torque translates into slow but steady torsion with a wide range of applied forces.
Screwing piles with special equipment
In professional construction, mobile svaeverts are used, operating on electric traction or internal combustion engines. They can also be used in everyday life. Another thing is that this rarely makes sense, since such a technique focuses on large-format rods, the width of the blades of which can exceed 60 cm. However, small-format elements are not excluded from the target material for such machines.
How to install a screw pile using a mobile rig? The equipment is brought to the installation point at a distance of 1-2 m. The working body is integrated with the pile head, after which a strictly vertical direction of force supply is established and the tightening process is started.

Subsequent operations of the device of the pile foundation
After the rods are installed, they are trimmed and the site is concreted. As for the first operation, it is associated with aligning the positions of the piles in height. This is necessary so that in the future it is possible to obtain a flat base on screw piles without the need to make corrective additions, then concreting is performed. This is the standard procedure for pouring concrete into the foundation base, but it should be borne in mind that the resulting screed is not related to the structural platform of the building.
Pros and cons of technology
Actually, the installation technique is the strong point of this method of arranging the foundation. An ordinary private trader can also cope with this task, calling for help from two or three partners. The specific technique for performing the operation depends on what kind of screw piles are used for the foundation. Do-it-yourself installation of small rods can well be done in a double-lever way, which is practically cost-free, but involves some risks in terms of the quality of the result.
The disadvantages of using piles include restrictions on the use on solid soils and the impossibility of building two-story and simply large private houses on such a base.
Conclusion

The technology was chosen by many owners of suburban households due to its affordability. It makes it possible, with a small investment, to create a reliable basis for various functional buildings, cottages, etc. Nevertheless, much will depend on the type of screw piles for the foundation itself. Prices with installation for thin models intended for the construction of a bath or utility room can fit into 1300 rubles. For 700-800 rubles. the pile will be available, and at 500-600 rubles. its installation will cost directly. For full-length material, these figures can increase by 20-30%. To this should be added the small costs for additional fittings, for example, the heads cost 200-300 rubles, and their installation - from 50 to 100 rubles. average.
Screw piles are used in the construction of pile foundations - one of the most common types of foundations used mainly on swampy or sandy soil. The pile itself is a pipe with thick walls and a tip made in the form of a helical blade. Using this tip, the pile is screwed into the soil. A head is welded to the second end, on which the future building will be fixed.
The length and diameter of screw piles can be different and depend not only on the weight of the structure, but also on the depth of the foundation.
| The content of the article: |
Design features
The strength of the pile foundation is achieved due to the fact that the blade, having stopped rotation, reliably fixes the pile in the soil and prevents it from being pushed out.
Screw piles
Ease of installation allows you to dispense with the installation without heavy lifting equipment and specialist assistance. But it is worth remembering that the strength of the structure depends both on compliance with the installation technology and on the quality of the piles. The latter, in turn, is mainly influenced by the shape of the blade.

Note! Experienced builders know that a good tip should have a slightly asymmetrical blade, so that the entry into the ground is as smooth as possible. If, when screwing in, difficulties not related to the peculiarities of the soil, then in the future the most unexpected consequences may arise - up to the destruction of the foundation.
Advantages of screw piles

- When screwing in, the soil is compacted and, accordingly, its bearing capacity increases, which is especially important in swampy areas.
- After dismantling the old building, the piles can be reused.
- The special design of the screw foundations makes them immune to frost heaving.
- No relief adjustments are required for construction. As a result, the time spent on land works is significantly reduced.
- The construction of a pile foundation is 70% cheaper than a slab or strip foundation.
- Piles can be installed with your own hands, without the involvement of special equipment.
- Installation of the foundation takes only two days, regardless of the weather or season. The construction of a house can be started immediately after the completion of installation.
Note! Screw piles cannot be screwed into rock only. This is perhaps the only limitation.
DIY screw piles
First, we note that any pile consists of three main elements:
- bearing base (pipes ø8.5 cm and more);
- blades welded onto a sharp tip;
- head for attaching the harness.

Of course, such a design can be done independently. To do this, you need to follow simple instructions.
Step 1. To make a pile, you will need a metal pipe of the appropriate diameter. The tip itself can be monolithic or made as follows: the end of the pipe is cut according to the pattern into sections of the required size, after which they are welded into a cone, and the welding seams are straightened.

Step 2. The screw is made from a discarded disc. Another option is to cut a new screw from 6 mm sheet steel using a prepared template.
 Screw pile tip
 The outer diameter of the screw depends on the characteristics of the soil - the deeper the pile is screwed in, the smaller it is.
Step 3. The screw head is clamped in a vice and stretched, after which it is welded to the pile and painted (or treated with an anti-corrosion agent).
Step 4. You will also need a head, which is necessary for attaching the channels.
Note! The blade width must exceed the outer diameter of the pipe by at least 3 cm!
Performing calculations
To do this, you need to invite a surveyor who will analyze the soil and draw a written conclusion about its bearing capacity. It will be quite expensive, but if you plan to build a house for permanent residence, you will have to spend money.
If a it comes about a small private house, then an approximate calculation of piles can be made without the help of specialists. You will have to take into account a lot of factors, such as:
- the weight of the roof and building structures;
- weight of thermal and waterproofing, roofing;
- the weight of the attic floor, etc.
Note! As an example, we take a 6x6 m log, made of ø20 cm logs. The average weight of such a house, taking into account all the loads, will be approximately 50,000 kg.
Calculating the number of screw piles for such a house is quite simple. You need to go to the manufacturer's website (provided that it is the factory piles that are used) and see the bearing load for which specific products are designed. For a medium-sized pile with a blade diameter of 30 cm, this load is approximately 3500 kg. It turns out that for a house with a weight of 5 tons, 14 pieces are required. If the number of piles is inconvenient from a constructive point of view, then it can be increased, but only upwards.
Now a few words about the height of the piles. Their underground part is screwed in below the level of freezing of the soil, while the height of the aboveground one is selected based on the relief features (on average, it is 0.5 m).
How to screw in the screw piles yourself?
The installation process always begins with the preparation of everything you need. In this case, you will need:
- heads 25x25 cm;
- water level;
- roulette;
- small stakes for marking;
- magnetic level;
- shovel;
- marker (always white);
- a pair of levers (two-meter pipes that will be worn on scrap iron);
- tank for the preparation of concrete solution;
- Bulgarian;
- cement;
- anti-corrosion coating;
- water;
- sand;
- diesel generator (if electricity has not been supplied yet);
- welding machine;
- assistants (at least three people).
Installation technology
 Features of the design of screw piles
 Step 1. First, the perimeter is marked. Based on geological and topographic data, a drawing is drawn up, which will indicate the exact number of piles. The products must be evenly distributed around the perimeter, while the distance between them should not exceed 3 m. If it is large, then the base of the house will not acquire the required bearing capacity and, therefore, the strapping bar will begin to sag.
 Installation example in soft clay, peat or water soil
a² + b ² = c²
If we imagine that the diagonal will divide the perimeter into two right-angled triangles, then a and b are the legs of each of the two figures, and c is the hypotenuse (diagonal).
After measuring the diagonals, small pegs are placed at the four corners.
 After measuring the diagonals at the four corners, small pegs are installed
 Step 3. The construction of the pile field begins with screwing in the corner piles - they will be a kind of landmarks for marking. Before screwing in, a small pit 50-70 cm deep is dug in a pre-marked place. As already mentioned, each pile must go deeper below the level of freezing of the soil - so it will not be squeezed out under the influence of frost heaving. Moreover, it is necessary to constantly check the horizontalness of the piles using a plumb line or level.
Note! A high bearing capacity can be achieved only when it rests on a thick layer of soil, therefore, the pile is screwed in until it stops. While it is scrolling, it needs to be deepened. Only when the pile comes to a complete stop is it considered to be properly screwed down.
 Screwing in piles
 The screwing procedure itself looks like this: a lever is installed in the technical hole - a scrap or a steel pipe of the corresponding diameter, then two larger pipes are put on the lever. A magnetic level is attached to the pile to control the verticality, the angle of inclination should be no more than 2ᵒ. If this is not done, then the load will be unevenly distributed and the pile itself, therefore, will be deformed.
Step 4. All other piles are screwed in according to the markings made earlier.
 Installation of screw piles
 Step 6. After cutting, the piles are concreted to protect their inner surface from corrosion. For the preparation of the solution, cement of the M-150 brand is used.
Step 7. The final stage of work is the welding of the heads. They are put on piles, welded and carefully cleaned the seam. Then an anti-corrosion agent is applied.
Binders are fixed to the heads for tying the future house.
Below are the design features of the piles and good installation tips.
- For the manufacture of the tip, it is better to use steel of the "twentieth" or "twenty-fifth" grade.
- All welds should be coated with a corrosion protection agent.
- The larger the propeller, the more difficult it is to manufacture the blade (too wide a disc is extremely difficult to unbend).
- When screwing in a pile with two blades, both need to be deepened below the soil freezing line. If this is not done, then the soil subject to frost heaving will begin to affect the upper blade (the one that remained above the freezing level) and sooner or later will destroy it.
- If for one reason or another the pile has gone to the side, then it is better to cut it off and screw in a new one next to it. It is undesirable to continue deepening, since the pile will sink during operation.
- When concreting a pile, the mortar must completely fill the pipe. This should be given special attention.
conclusions
Having dealt with all the nuances of the installation, it will be quite simple to tighten the screw piles. You just need to invite a few friends, wait for a suitable sunny day and build a solid and solid foundation.
Construction has always been and remains a responsible business. The durability of the structure depends on the quality of work. The foundation is considered an important part of any building. In modern construction, screw piles are often used. This technology helps to significantly reduce financial costs and construction time.
Screw piles are screwed into the ground using special equipment, but few people know that it is possible to do this with their own hands. The article describes in detail how to install piles manually. But before we look at the installation process, let's take a closer look at this modern technology.
Application
Screw piles are used as supports in difficult soil: uneven terrain, swampy or frozen soils. The technology originally came from the craft of war, where you need to quickly build and disassemble special-purpose objects. Now this method is actively used in civil engineering.
They are used for the construction of the following structures:
- frame and modular buildings, low-rise buildings;
- light structures, fences, advertising boards;
- supports for high-voltage lines and pipelines;
- bridges, moorings.
Installation is carried out hydraulically or manually. Piles are screwed into the ground like a self-tapping screw. If the soil is very frozen, a leader well is made. Their design bearing capacity depends on the correct installation of the supports.
Advantages and disadvantages of a screw foundation
- erected faster than a concrete foundation;
- used in swampy, unstable and icy soils;
- ready for full load after screwing;
- can be installed at any time of the year;
- it is not required to level the landscape;
- are cheaper than a concrete foundation.
disadvantages
- limited service life;
- cannot be applied on rocky ground;
- it is difficult to make good anti-corrosion protection.
This is hard work, so small diameter piles are used because they are easier to screw in. The screwing of the supports by hand occurs in order to save money or when it is impossible to do it by machine. The manual method allows you to build small structures, for example, a bathhouse, a gazebo or a fence. The work will require simple tools and a few assistants.

Possible obstacles
Manual installation becomes more difficult if there is a lot of debris or stones in the ground. Make sure it does not contain large items such as rubble, iron, bricks, etc. Small debris will not interfere, but large stones will cause the support axis to deviate or the blades will bend.
Sometimes concrete blocks or slabs lie in the ground, which cannot be removed without serious digging of the site. This problem can stop the entire installation process or make significant adjustments to the layout of the foundation.
Try to find an area free of overgrowth within a 20 m radius. The root system, especially of large trees, is well developed. Even a rotten stump located nearby will make it much more difficult to screw in the piles.
Long levers must be used to manually screw in the pile. If there is a building, fence or post next to the planned building, they will interfere with the installation of supports.
Preparatory work
- Installation of screw supports begins with a search and inspection of the construction site. Examine the ground carefully. The choice of piles of a certain diameter depends on its condition. Too dry or clay soil it is difficult to screw in large supports.
- After choosing the right piles, calculate how many pieces will be needed for the work. It depends on their number what the distance between them will be during installation.
- In order for screw piles to serve regularly for many decades, they carry out anti-corrosion treatment. Several layers of protective coating are applied.
There are several processing options:
- metal primer - standard coating;
- bituminous mastic - protects the pile surface from contact with moisture;
- cold galvanizing - zinc, interacting with the metal surface of the pile, creates a weak electric current, which prevents corrosion;
- cold galvanizing and bituminous mastic - combined processing;
- cold galvanizing, bitumen mastic and plastic foil - the first two layers of protection are covered with a heat-shrinkable film, this provides maximum protection.
Screw pile mounting tools
- Shovel - for aligning screwing points.
- Magnetic level - will help control the position of the pile.
- Drill - must be smaller in diameter than screw piles.
- Roulette - required to take measurements.
- Hydrolevel - used to set horizontal marks.
- A scrap and two pipes 2 m long - levers will be obtained from them.
- Hammer - needed to drive the peg.
- Grinder - for cutting piles.
- Thin rope - for marking the foundation.
- Knife, gloves, pencil.
Foundation marking
Accuracy and precision in calculations is required. You will need a rope and pegs to work. If the foundation is rectangular, first define the corner support points. Hammer in the pegs and connect them with a rope. Try to make the shape of the rectangle even. On each side, define equidistant points for the remaining piles. After all the marks are placed, you can start installing the supports.
Screw pile installation technique
You must first install the supports in the corners. To do this, drill pilot holes. The depth should be equal to 1/3 of the pile length, and the size should be less than the pile diameter. After starting the installation process, try to control the evenness of the vertical position of the support. The magnetic level will help you.
The piles are screwed in using levers, in our case it is a regular scrap. When the twisting becomes tight, the levers are lengthened with additional pipes. This process should take place evenly and on command, so as not to displace the support.
If the pile stops turning, it means that you have reached a layer of soil that is dense enough to support the weight of the structure. In this case, do not continue screwing in. After the corner piles are installed, connect them with a rope from the bottom and from the top. This will help keep the rest of the legs aligned - vertically and vertically.
When the foundation is ready around the perimeter, place the marks on the inside. For this, the columns of parallel sides are connected with a rope. In the crossing points, it is necessary to drill holes for the installation of the internal foundation piles.
The manual method does not allow the installation to be carried out smoothly. Even if you screw in smoothly and slowly, the support will gradually go away. Therefore, it is periodically necessary to check the degree of deflection with a magnetic level. If the displacement is significant, then move the pile until it is level and make a few turns.

The displacement is influenced by the stones stored in the ground. In this case, it is difficult to align the supports. There are two ways to solve it: first, roll the pile deeper than the stone and loosen it so that it can be placed evenly and make several turns. Second, pull out the support, use a drill to go through the difficult section of the ground, and then continue with the installation.
Pruning
Not all piles can be screwed to the desired level. Therefore, they are shortened with a grinder, leveling in height. It is recommended to cut below the lever insert hole. It is convenient to draw marks using a hydro level - a long, thin hose filled with water and working on the principle of communicating vessels.
Concreting
After cutting, the screw piles are poured with a mixture of concrete and sand. The solution should not be too thick or runny. This procedure makes the supports stronger and more resistant to stress. Some builders add reinforcement to the pipe to add stiffness.
The concrete protects the inner surface from the ingress of oxygen and moisture and prolongs the life of the foundation. If the installation of piles takes place during the cold season, winter additives are added to the solution. They will make the concrete resistant to low temperatures.
When the solution dries, the pipe is sealed with caps for subsequent strapping. Welding seams are treated with an anti-corrosion agent.
Screw piles are a practical technology for the construction of any structure. Inexpensive cost and fast installation speed made this type of foundation in demand. Screw pile technology is now available to everyone. You can apply it yourself or use the services of construction firms.
Video: twisting screw piles with your own hands